Mastering Fry Bread: Secret Tips for Golden, Fluffy Perfection
Imagine biting into a warm, pillowy cloud with a lightly crisp, golden exterior, tasting subtly savory or delightfully sweet. This is the magic of fry bread, a beloved culinary staple that transcends mere sustenance, embodying a rich tapestry of history, resilience, and community. While its origins are deeply rooted in Native American culture, particularly with the Navajo people, its universal appeal lies in its comforting texture and incredible versatility. Many home cooks aspire to replicate the authentic, tender perfection found at traditional gatherings and food stands, often wondering why their attempts fall short. The good news? Achieving that ideal golden, fluffy, and perfectly crisp fry bread is not an insurmountable task, but rather a journey of understanding a few crucial techniques. Get ready to unlock the secrets to truly masterful fry bread that will have your family and friends requesting it again and again.
Fry Bread: A Dish Steeped in History and Cultural Heart
To truly appreciate fry bread, one must understand its poignant and complex history. It is widely believed that this iconic dish first emerged around 1864, during a harrowing period for the Navajo people. Forced by the United States government to embark on the "Long Walk," a brutal 300-mile relocation from their ancestral lands in present-day Arizona to New Mexico, they arrived in an unfamiliar territory unsuitable for their traditional crops. To prevent starvation, the government provided rations that included commodities like flour, processed sugar, canned goods, and lard. It was from these basic, often unfamiliar provisions that the ingenuity of the Navajo people created fry bread – a resourceful and filling dish designed to sustain them through hardship. What began as a food of survival evolved into a symbol of cultural resilience and a culinary cornerstone.
Today, fry bread is far more than just food; it’s a cultural touchstone. Throughout the United States, various Native American tribes, including the Seminole, Osage, and Cherokee, have embraced and adapted their own distinct variations of this pan-fried flatbread. Each tribe's recipe may feature subtle differences – some incorporating milk, milk powder, shortening, or even yeast – but the essence remains the same: a warm, comforting bread that brings people together. It's a fixture at powwows, family reunions, and community events, serving as a delicious conduit for sharing stories, traditions, and togetherness. Its versatility further cements its status, equally at home as a savory accompaniment or a delightful sweet treat.
The Anatomy of Perfect Fry Bread: What Makes It Stand Out?
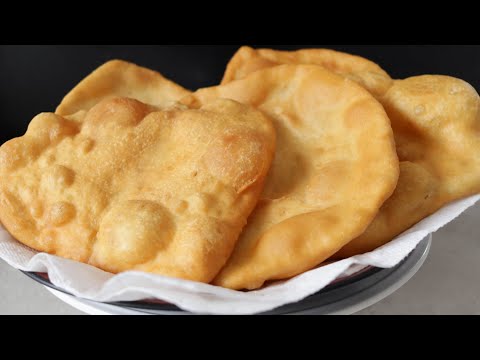
When we talk about "perfect" fry bread, we're envisioning a specific sensory experience. The ideal fry bread boasts a beautiful golden-brown hue on its exterior, hinting at its crispiness. Upon breaking it open, you should find a wonderfully fluffy, airy interior, often with a signature hollow center, indicative of proper puffing. The texture should be tender, never tough or dense, and certainly not greasy. This delicate balance of textures and flavors is what elevates a good fry bread to an exceptional one.
Its versatility is another hallmark of its perfection. While it shines brightly when served as the foundation for hearty, taco-like toppings – think seasoned ground beef, beans, shredded lettuce, cheese, salsa, and sour cream – its appeal doesn't stop there. It transforms effortlessly into a sweet indulgence, drizzled with honey, dusted with powdered sugar like a funnel cake, or sprinkled with cinnamon sugar. This adaptability makes fry bread a culinary chameleon, suitable for any meal or occasion.
Secret Tips for Golden, Fluffy Fry Bread Perfection
Achieving that coveted golden, fluffy, and perfectly crisp fry bread requires attention to a few key details. Forget tough, dense, or soggy results; these secrets will guide you to culinary success.
The Dough: Ingredients and Mixing for the Ideal Base
- Fresh Baking Powder is Non-Negotiable: This is your primary leavening agent. A fresh, active baking powder is absolutely essential for creating those delightful pockets of air and the signature puffiness. Old, stale baking powder will result in flat, dense fry bread. Test its freshness by mixing a small amount with hot water – it should fizz vigorously.
- The Right Balance of Basics: Most authentic fry bread recipes, like ours, stick to simple ingredients: all-purpose flour, baking powder, salt, and water. While some variations add milk or shortening for richness, mastering the basic recipe first is key. The salt isn't just for flavor; it also helps regulate the gluten structure.
- Hydration and Kneading: Gradually add water to your dry ingredients, mixing until a shaggy dough forms. Then, turn it out and knead it until it's smooth and elastic, but not overly stiff. The dough should be soft, pliable, and just slightly tacky. Over-kneading can develop too much gluten, leading to a tougher bread, while under-kneading leaves it crumbly. Aim for a dough that springs back slowly when poked.
The Golden Rule: Resting the Dough
This is arguably the most critical secret to tender, pillowy fry bread, often overlooked by beginners. Many professional bakers will tell you that skipping this step is the fastest route to tough, chewy results.
- Why It's Essential: Resting the dough allows the gluten, developed during kneading, to relax. This relaxation is what makes the dough tender and easy to stretch, preventing it from snapping back. More importantly, relaxed gluten allows the dough to puff up beautifully and evenly when it hits the hot oil, creating that desirable airy, hollow interior.
- How Long and How: Cover your kneaded dough with a damp cloth or plastic wrap and let it rest at room temperature for at least 30 minutes, and ideally for an hour. Some traditional recipes even call for longer rests. Do not skip this! It truly transforms the texture.
Shaping for Success: Artistry in Your Hands
Once rested, your dough is ready for shaping. This step influences both cooking and final texture.
- Portioning: Divide your dough into equal-sized balls, typically golf ball to tennis ball size, depending on your desired fry bread size. Even portions ensure even cooking.
- The Traditional Stretch: While a rolling pin can be used, the traditional method involves hand-stretching and pulling. Take a dough ball and gently stretch it from the center outwards, thinning it evenly. You're aiming for a roughly circular shape, about 6-8 inches in diameter. The edges can be slightly thicker than the center, contributing to the rustic charm and a nice textural contrast.
- The Signature Hole: Many fry bread makers create a small hole in the center of each piece of dough before frying. This isn't just for aesthetics; it helps ensure even cooking by allowing the hot oil to cook the center of the bread more efficiently, preventing raw spots and promoting better puffing.
Frying Fundamentals: Temperature is Key!
The oil temperature is the second most critical factor after dough resting. Get this wrong, and even a perfectly rested dough will yield less-than-ideal results.
- Oil Choice: Opt for oils with a high smoke point, such as vegetable oil, canola oil, peanut oil, or shortening. These can withstand the necessary high temperatures without breaking down or imparting off-flavors.
- The Magic Number: The ideal temperature for frying fry bread is typically between 350-375°F (175-190°C). This is hot enough to create an instant golden crust and puff the bread quickly, trapping steam inside to create that fluffy interior.
- Consequences of Wrong Temperature:
- Too Cool: If your oil isn't hot enough, the fry bread will absorb too much oil, becoming greasy, soggy, and dense. It won't puff up properly.
- Too Hot: If the oil is too hot, the outside will burn and turn dark brown before the inside has a chance to cook through and become fluffy. This results in a tough exterior and potentially undercooked interior.
- Testing the Oil: A deep-fry thermometer is your best friend here. If you don't have one, test a small pinch of dough – it should immediately sizzle vigorously and float to the surface within seconds.
- Don't Crowd the Pan: Fry only one or two pieces of fry bread at a time, depending on the size of your pot or skillet. Crowding the pan will dramatically drop the oil temperature, leading to greasy bread.
- Flipping: Once one side is beautifully golden brown (usually 30 seconds to 1 minute), carefully flip it with tongs and fry the other side until it's also golden.
Draining and Serving: The Final Touches
After frying, quickly transfer your golden pieces of fry bread to a wire rack set over paper towels. This allows excess oil to drain away, keeping them crisp and preventing sogginess. Fry bread is always best enjoyed fresh and warm, so serve immediately after draining.
Beyond the Basics: Elevating Your Fry Bread Experience
With your newfound mastery of basic fry bread, the culinary possibilities are endless!
- Savory Delights: Transform your fry bread into hearty fry bread tacos by piling on seasoned ground beef or shredded chicken, refried beans, crisp lettuce, cheese, fresh salsa, and a dollop of sour cream. It's also an excellent accompaniment to chili, stews, or savory braised meats, soaking up every delicious drop.
- Sweet Indulgences: For a dessert-like treat, sprinkle warm fry bread with cinnamon sugar, drizzle with honey or maple syrup, or dust with powdered sugar. Consider pairing it with fresh berries, fruit compotes, or even a scoop of vanilla ice cream for a truly decadent experience. A simple honey butter spread is also heavenly.
Conclusion
Making truly perfect fry bread is a rewarding culinary endeavor that connects you to a rich history and a vibrant culture. By understanding the importance of fresh ingredients, patiently resting your dough, precisely controlling your oil temperature, and mastering the simple art of shaping, you'll consistently create those golden, fluffy, and perfectly crisp masterpieces. More than just a recipe, fry bread is an experience – a delicious reminder of resilience, community, and the simple joy of sharing good food. So, gather your ingredients, follow these tips, and embark on your journey to mastering this incredible dish. Your taste buds, and your guests, will thank you.
